
This chapter contains the following topics:
Introduction to Company Information
Second Tab - Package / Screen Controls
Special Printing Features and Control Codes
The Company information selection enables you to record information about your company, such as the company name, address, etc.
Company information also provides some basic options affecting the way your Passport Business Solutions software works.
Among these options are:
| • | Which modules (A/P, A/R, G/L, etc.) appear on the menu. |
| • | Whether to use batch controls and change logs. |
| • | Account number and cost center setups. |
| • | PBS printer controls. |
| • | Email setup and configuration test |
The information you enter is stored in the Company File, and is shared by all Passport Business Solutions applications. For similar information specific to individual modules, refer to the Control Information chapter of each module’s documentation. See the PBS Documentation section of the Introduction to PBS Administration chapter for links to the documentation.
Installation
When you installed your PBS software, default information was automatically entered into Company information. Some of this information will be as you want it, and some will need changing. For example, the installation procedure sets the company name to Installation Procedure which you will want to change to your company’s name.
Select
Company information from the CTL menu.
Five tabs are required to enter all the necessary information. None of your entries take effect until all the tabs have been entered and saved. These screens show either:
| • | The values in company information assigned by the installation procedure (if you are installing Passport Business Solutions software for the first time), or |
| • | The values that have already been set by your company. |
If this is the first case, you will want to follow the instructions in this chapter to change the default information to what is needed for your company.
If you are setting up emailing for the first time, you only need to select the Email tab, enter the fields and run a test. No other changes to Company information is needed. What is required will depend on your company’s needs.
In either case, the information in the examples in this chapter is for illustrative purposes only. Be aware however that the examples in the rest of the documentation have been selected to be consistent with the ones shown in this chapter.
Graphical Mode
The first tab displays as follows:
Character Mode
The first screen displays as follows:
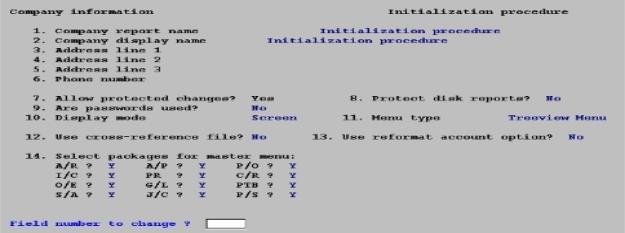
Enter the following information:
Enter your full company name. The name will be printed as the heading on all reports. It will also print on the Payroll Pay advice PDF form. Your entry is centered in this field.
|
Format |
50 characters |
|
Example |
Type: XYZ Company |
Enter the company display name that displays on most PBS screens. In Windows and Thin client this name will also display on the title bar to the right of the company number.
This name is used on some special forms such as A/R statements.
|
Format |
30 characters |
|
Example |
Type: XYZ Company |
Address line 2
Address line 3
Enter the address of your company. The address is used primarily on special forms such as payroll checks and Pay advices.
|
Format |
30 characters for each field |
|
Example |
Type: 500 W. Lincoln Blvd Suite 1005 Anytown, Texas 12345 on three successive lines. |
Enter your company phone number. The phone number is automatically printed on certain special forms.
|
Format |
12 characters |
|
Example |
Type: 555-123-4567 |
This is a protected field and if you are not allowing protected changes, it can only be edited if you turn on allow protected changes (See Allow protected changes field - field 7 in character mode). Once you allow protected changes, you must exit Company information and come back in to change this field.
Your entry here determines how the system interprets the century for dates. Entered dates are in MMDDYY format. They are stored internally as MMDDYYYY.
During data entry, when you enter the year as two digits, your entry is compared to this cutoff figure. If your entry is greater that this cutoff, then the year is assumed to be 19XX. If your entry is less than this cutoff, then the year is assumed to be 20XX.
For example, if this field is set to 30, then years entered as 00 through 20 are interpreted as 2000 through 2030. Years entered as 31 through 99 are interpreted as 1931 through 1999.
You must set this field to a year that is well beyond your working date. For example, the ship-date in Order Entry and the Next Review date in Payroll Employees is usually a future date and if the date is in another year, then this field should anticipate that. But, if you have Payroll Employees, it should not be greater than the birth date of the oldest person in your company. We recommend that you set this date at least 5 years beyond the current year.
The default following a PBS installation, running EZ Convert and adding a new company is 30.
Batch processing allows accumulating transactions into a batch that can be used for transaction entry, editing and posting. Batch control can be used with either A/P or A/R.
Batch controls must be authorized here before they can be used by any module, but they must also be authorized in the Control information within each module where they are wanted. This permits you to use batch controls (for example) in A/R but not in A/P. Not all modules make use of batch controls. However, Point of Sale is batch oriented by POS user and by store. G/L General Journal is batch oriented by Entry #.
Refer to the Using Batch Controls chapter in the PBS System documentation for information on batch controls in general.
The next 2 fields are used in the company-wide settings for batch controls.
Use batch controls
Check this box to use batch controls or leave it unchecked to not use them.
|
Format |
Check box where checked is yes and unchecked is no. |
|
Example |
Check the box and then press <Enter>. |
This field cannot be entered if you left the previous field unchecked.
All batches, without regard to type, are assigned numbers in sequence beginning with the number you enter here.
|
Format |
999999 |
|
Example |
Type: 23 |
Security
Some functions of Passport Business Solutions software contain information which can be protected against being changed. This information is usually the type which is generated during posting, such as historical accounting figures.
If you check this box to allow protected changes, authorized users will be able to change protected information (after having been warned).
|
Format |
Check box where checked is yes and unchecked is no. |
|
Example |
Check this box and then press <Enter> |
If the field Allow protected changes is checked in Company information, it is possible to override the protected change on certain fields. Protected changes are necessary to not only maintain database integrity but to restrict certain vital account information from being modified.
For example, if your valuation method is set for standard costing, it would not be advisable to inadvertently switch costing methods because of the changes to the layered information that would be effected by this change. In this instance, all associated fields would be protected, and an override would not be allowed. However, it may be possible to override fields such as sales amount and returned check amount.
If you perform a function on a field, and the Change not allowed message is displayed, press <F2>. If this field is not protected, you may be able modify the field’s contents. The message Allowing protected change will display. Once protected change has been overridden, it is not necessary to press <F2> again. The override remains in effect for subsequent transactions within this application and this session.
Maximum field security is achieved when:
| • | Allow protected changes is left set to unchecked and |
| • | The Company information menu selection, protected by a password, is assigned and known only to the system administrator. |
This ensures that whenever necessary the system administrator can rapidly override change protection on any field that permits it, without imposing any restriction on the normal use of any other selection.
See the Payroll Control information chapter for information on protecting employee's social security numbers and bank account numbers.
This field cannot be changed. Passwords are required to access PBS.
Passwords protect all or part of the software from unauthorized use. You must enter the password as part of entering the user information. See the PBS Users chapter.
You may also assign a general menu to a user to restrict the user to certain menu selections. See the PBS Menus chapters.
A change log is a report which shows all changes to records in a master file; for example the A/R Customers, the PR Employees or I/C Items. Change logs provide an audit trail of who changed your files, when, and how.
Check this box to use change logs for all modules, leave it unchecked to not use them. If you choose to use change logs, each master file will have its own change log.
As changes are made to the master files, change logs grow and claim more disk space. You can reclaim this space by purging change logs periodically. After purging change logs, a report prints noting all changes that were purged so that you have a permanent record of these changes.
|
Format |
Check box, where checked is yes and unchecked is no. |
|
Example |
Check the box and then press <Enter>. |
Check this box to allow the reformat account number feature.
|
Format |
Check box, where checked is yes and unchecked is no. |
|
Example |
Check the box and then press <Enter>. |
Cross reference file
Check this box to permit linking your current account numbers to other account number structures. These may be either:
| • | Those you used before upgrading from a previous release |
| • | Those you used prior to reformatting your account numbers |
| • | External (i.e. non-Passport Business Solutions) account structures |
Whenever you need to enter an account number on any screen, you can do so by selecting from the cross-referenced account number structure. The system will automatically translate your selection to current Passport Business Solutions account numbers. Refer to the External Cross-reference chapter of the System User documentation.
|
Format |
Check box, where checked is yes and unchecked is no. |
|
Example |
Check this box and then press <Enter>. |
Scan accounts pop-up box default
If you checked the box to the Use cross-reference file field, Field #12 in character mode, you must decide which account structure will appear in the pop-up selection window whenever the cursor is in an account number field and you press <F8>. Although your current account number structure may be cross-referenced to all three of the others, only one account structure at a time can be accessed by <F8>.
If you leave the box unchecked to the previous question, <F8> is still available but only current Passport Business Solutions account numbers are displayed.
Your drop down list choices are:
| Character | Graphical |
|---|---|
|
N |
Current account |
|
P |
Previous account |
|
1 |
1st external cross-reference account |
|
2 |
2nd external cross-reference account |
Enter a choice from the list above.
|
Format |
One option from the list above. |
|
Example |
Select 1st external cross-reference account. |
This lets you change the format of your account number without harming or losing historical data. There is significant flexibility provided by the ability to reformat account numbers. Refer to the Reformatting Account Numbers chapter. Reformat accounts is not available for Point of Sale or the manufacturing files.
Print reports from disk
For an explanation of the user features, see the Printing reports from disk chapter in the PBS System documentation.
Select Limit access by user menu/ID to protect disk reports. Select Not protected to not protect the reports.
This field ties in with the print reports from disk feature and menu maintenance. General users that have been assigned a menu will only be able to print reports from disk that they themselves are capable of creating. Administrative users are not affected by this selection.
After you choose to protect reports that have been printed to disk, you will then have to set up a custom menu and assign this menu to a user. See PBS Menus for information on setting up a menu. If using one company in PBS, see User menus (button) in the PBS Users chapter for assigning a menu to a user. If using multiple companies see Multi-company Access Menus.
The general user who has been assigned a custom menu will only have permission to view and print reports-from-disk that the user has permission to create. The permission is based on the set up in the Passport Business Solutions menu maintenance. If the user has permission to print the report TO disk, then the user has permission to view or print the report FROM disk. Similarly, if the user cannot print the report to disk, then the user can neither view nor print the report. The same applies to stacking reports.
|
Format |
Drop down list |
|
Example |
Select Limit access by user menu/ID |
Check this box to save registers or leave it unchecked to not save them.
| • | A checked box (Y in character) means that a duplicate copy of a register (a report created whenever posting occurs) is saved to disk whenever you send the register to a physical printer at the time of original creation. This is a safety feature in case the hard copy is lost. |
You can purge saved registers at any time using Purge saved registers, located on the menu under Print reports from disk.
If you directed the register to disk upon original creation, it makes no difference on your choice here. Only one copy is stored, which must still be printed at least once before it can be removed from disk (by the Delete reports selection, not the Purge saved registers selection).
| • | An unchecked box (N in character) still allows you to direct a register to disk or to a printer but not both. If you send it to the disk, you cannot delete it until you have physically printed it from disk at least once. |
|
Format |
Check box, where checked is yes and unchecked is no. |
|
Example |
Check the box and then press <Enter>. |
This field does not appear if you have chosen not to save printed registers.
Enter the maximum number of days that you wish to retain saved registers. For example, if you enter five days a warning will appear whenever the oldest register saved is more than five days old. The warning will display when you access the menu selections of Print a report, Stack reports and Print a stack.
Note that registers are not automatically purged; the value you enter here only controls the timing of your warning.
|
Format |
999 |
|
Example |
Type: 90 |
Make any changes needed and select enter to continue to the next tab.
The second tab looks something like this:
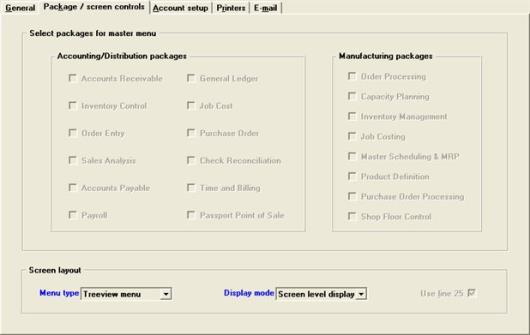
Select packages for master menu
A separate field can be entered for each Passport Business Solutions application (General Ledger, Accounts Payable, etc.) Check the box to make a module appear on the Passport Business Solutions master menus; leave it unchecked to make it not appear. If you are not licensed for a module it will not be available, even if you check the box, because it was never included with the Menu during installation.
You can display a module on the menu even though you have not installed it for a company. If you select a module to make it appear, but the programs and data files are not installed for that company, it will not be a functional module. If you are not licensed for a module and you want to look at the screens and features of a functional module you can order the live version, receive a new license with the module and install it. You may also request to see a demo version of PBS, however you will not be working with your data.
You may also assign custom menus to general users. To learn more about this read the PBS Users and PBS Menus chapters. This is a most secure way of not allowing access to certain PBS functions.
Removing a module here does not necessarily remove all the effects that module has on other modules. For a complete removal, it is recommended that you also remove the paths to the programs and files for that module.
If no module is selected, only the CTL menu will display.
|
Format |
Check box, where checked is yes and unchecked is no. |
|
Example |
Check the box for each module |
This selection is available for Windows and Thin client only and will not be present on Linux installations.
On Windows computers, you may display your Passport Business Solutions application menus in one of three different ways. Menu bar. Windows menu or Tree-view menu.
|
Note |
The legacy Multi-level menus are no longer supported. |
After you select or change the menu type, it will not take effect until you restart PBS.
These menu types are explained more fully in the Starting PBS, Menus and Printing chapter of the System user documentation.
|
Value |
Function |
|
Menu bar |
To display the Menu bar application menu. This is a legacy menu type that originated with RealWorld software |
|
Windows menu |
To display the Windows application menu |
|
Tree-view menu |
To display the Tree-view application menu |
|
Note |
If you elect to use the Tree-view or Windows menu, the Access Groups and Temporary Access features will not be available to you. For more information about these features, see the Temporary Access and Access Groups section of the Starting PBS, Menus and Printing chapter in the PBS System documentation. If you are running the Windows version of PBS, you may take advantage of the concurrent usage feature that allows opening PBS on the same computer as many times as you want but with only using up one runtime user. This is also more fully described in the Starting PBS, Menus and Printing chapter in the PBS System documentation. |
|
Format |
Drop down list |
|
Example |
Select Tree-view menu |
This is an outmoded option and your selection here will have little or no influence on the functionality of the screen display. It may still be useful when using slower display monitors such as a WYSE 60.
Dumb terminals such as WYSE 60 are no longer officially supported in Passport Business Solutions.
Make any needed changes, or press <Enter> to continue to the second screen.
Graphical mode is not affected by this selection.
If you are in character mode and using a monitor, such as a WYSE 60, and it can display 25 lines, check this box. If it can display only 24 (or you do not know), uncheck it. Passport Business Solutions Advanced Features will make use of a 25th line if it is available.
The selection of line 25 is a legacy hold-over of when the old style dumb terminals were the primary method of viewing and inputting data. There may be a few users that still have these terminals, but for modern systems you should always check this box.
|
Format |
Check box, where checked is yes and unchecked is no. |
|
Example |
Check the box and then press <Enter> |
Dumb terminals such as WYSE 60 are no longer officially supported in Passport Business Solutions.
Make any changes or select enter to go to the third tab.
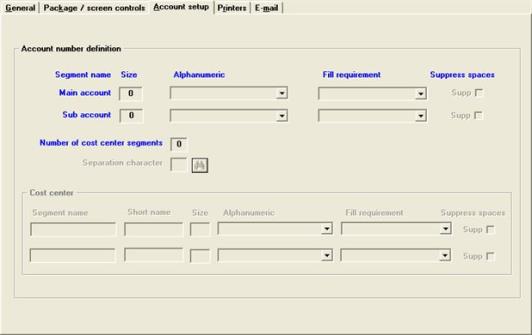
The fields on this tab define the format of your General Ledger account number.
You can enter information into these fields only in the add mode. To change an existing format, refer to the Reformatting Account Numbers chapter.
The account number may contain up to seventeen characters including the characters used to separate adjacent segments. There may be up to four segments. Some examples:
| • | xxx-xxxx-xxx |
| • | xxxxxxxx-xxxxxxxx |
| • | xx-xxx-xxxxx-xxx |
| • | xxxxx-xxxxx-xxxxx |
| • | xxxx-xxx |
When using multiple companies and you plan on consolidating data for these companies, you should review the Company consolidation chapter in the General Ledger documentation before you set up your account structure. The more similar the account structure and chart of accounts the easier it is to link accounts between the member companies and consolidation companies.
The minimum format is an account number consisting of a single segment of four characters (xxxx). This is the main account. The main account is used to separate transactions by their nature, such as Cash, Receivables, Inventory, Equipment, Accounts payable, Notes payable, Equity (or capital), Sales, Purchases, Repairs, Taxes, etc. For example, 2300 may be the account number for Notes Payable.
Although the minimum size defined for the main account is four characters, an individual account number is not required to contain four characters. An account number of “A” or “1” is permitted.
The maximum format is four segments consisting of two cost center segments, the main account, and a sub-account. For example, 010-123-23000-050 may mean Burlington division (010), repairs department (123), notes payable (23000) to First National Bank (050).
|
Note |
The Point of Sale and Manufacturing modules can only use a main and sub account structure. Do not set up cost center segments when any of these modules are installed for this company. |
Graphical Mode
From this tab you enter these fields:
Character Mode
From this screen, enter the following information:
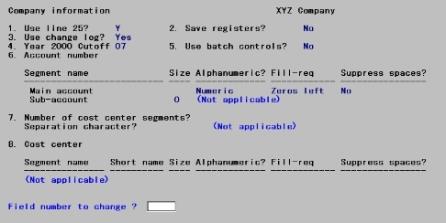
Enter the account number segments.
The first two segments can be used for divisions, departments, locations, product lines or territory. Your company may elect to use one or two segments, or none. If one segment is used, the default title is “department”. If two segments are used, “division” and “department” are their respective default titles. You can change these titles if you wish.
The main account number is used for primary designations.
The sub-accounts are used to keep separate records in your general ledger for items that would otherwise go in the same main account. An example of this might be separating notes payable that are due to different banks.
Refer to the Reformatting Account Numbers chapter information for the syntax rules of account number segments. The following is an abridged version:
| • | When all the segments are used, they are in this order: |
| • | Cost center (first segment) |
| • | Cost center (second segment) |
| • | Main account |
| • | Sub-account |
| • | The main account segment is required and must be at least four characters long. The other segments are optional. |
| • | No segment may contain more than eight characters. Actual segment length, however, is determined on a case-by-case basis since 17 characters is the maximum for the entire account number. |
| • | Cost center if used may consist of either one or two segments. The cost center is separated from the main account by a punctuation character, which defaults to a hyphen (-) unless you specify otherwise. |
| • | Where required, a hyphen separates the first segment of the cost center from the second, and the main account from the sub-account. This hyphen cannot be replaced by another character. |
Most examples in this documentation and user documentation have two segments.
| • | The main account is four digits |
| • | The sub-account is three digits |
| • | The documentation clearly states when other account number layouts are used to illustrate a feature |
For example, 100-6330-SUI might be Main Street - Payroll taxes - State Unemployment Insurance. Note that even though the main account allows a four character alphanumeric entry, you may use a shorter entry or (as in this example) a purely numeric one.
If you are upgrading from versions prior to Version 7, or have converted from another vendor’s product, please note that it is no longer necessary or possible to represent cost centers by sub-accounts. If you will be doing so, reformatting your account number is a necessary part of your upgrade. See the Use reformat account option field and the Reformatting Account Numbers chapter.
Main Account Segment
Enter information for the main account as follows:
Enter the size of the main account number, with 4 as the minimum size and 8 as the maximum size.
|
Format |
9 |
|
Example |
Type: 4 |
Enter Allow numbers and letters to designate the main account number as alphanumeric (permitting both letters and numbers), or Allow numbers only to designate it as numeric only.
|
Format |
Drop down list with the choices described above. |
|
Example |
Select Allow numbers only and then press <Enter> |
For numeric segments, leading zeroes are automatically selected by the system and cannot be changed.
Fill is needed when data in an alphanumeric segment does not occupy all the character positions available.
You can use leading zeros (Fill with zeros on left) or trailing spaces (Fill with spaces on right). Leading zeros means data is stored in the segment on the right and zeros fill unused positions on the left.
Trailing spaces means data is stored in the segment on the left and spaces fill unused positions on the right. For example, a four character segment having the value “37” entered:
|
Example |
Leading zeros: 0037 |
|
|
Trailing spaces: 37xx (where x represents a space) |
Fill with spaces on right is customary, but Fill with zeroes on left is useful for segments primarily intended to contain numbers but which may occasionally contain a letter.
|
Format |
Drop down list choices of Fill zeros on left or Fill with spaces on right. |
Example
In this example the field is automatically set to Fill with zeros on left because you have entered Allow numbers only for the Alphanumeric field.
If you selected Fill with spaces on right at Fill requirement, you must decide here whether any trailing spaces are suppressed—that is, whether the remainder of the account number is to be floated to the left so as to close up the gap.
| • | If you check this box, trailing spaces are suppressed. This gives a more pleasing appearance to the individual account number; however, if your segment varies in length, a column of such account numbers will appear ragged and difficult to read. |
| • | If you leave the box unchecked, trailing spaces are not suppressed and embedded blanks appear in the account number. |
If the previous field is Fill with zeros on left, this field may not be entered.
|
Format |
Check box where checked is yes and unchecked is no. |
Example
In this example the field is (Not available) because you have Allow numbers only for Alphanumeric.
Sub account Segment
Enter information for the sub-account as follows:
Enter the size of the sub-account number, with 0 as the minimum size and 8 as the maximum size.
A value of 0 indicates that you do not use sub-accounts. The remaining sub-account fields on this line of the screen will display (Not applicable).
|
Format |
9 |
|
Example |
Type: 3 |
This field has the same meaning as for the main account number Alphanumeric field described above.
|
Format |
Drop down list with the choices Allow letters and numbers or Allow numbers only. |
|
Example |
Select Allow numbers only and then press <Enter>. |
This field has the same meaning as for the main account number Fill requirement field described above.
|
Format |
Drop down list choices of Fill zeros on left or Fill with spaces on right. |
|
Example |
In this example the field is automatically set to Zeros left because you have entered Allow numbers only for Alphanumeric. |
This field has the same meaning as for the main account number Suppress spaces field described above.
|
Format |
Check box, where checked is visible and unchecked is no. |
|
Example |
In this example the field cannot be entered because you have entered Allow numbers only for Alphanumeric. |
|
Note |
Following the setup of company information, if you are using sub accounts or cost centers, then you must enter either the sub accounts or cost centers respectively using the menu selection Cost centers / Sub accounts. If you are using cost centers and sub accounts, then enter the cost centers. |
Number of cost center segments
If the size of the main and sub-account segments (including the separator) is 16 or 17 characters, no room remains for a cost center, and this field displays as 0 and may not be changed.
A value of 0 indicates that you do not use cost centers. The remaining fields on the screen cannot be entered.
Enter 0, 1 or 2 for the number of cost center segments.
|
Format |
9 |
|
Example |
Type: 0 |
If you have entered 0 in the preceding field, this field cannot be entered.
Enter a character to separate the cost center from the main account number.
Allowable values are shown in the following table.
|
Character |
Description |
Character |
Description |
|
! |
Exclamation mark |
] |
Right bracket |
|
: |
Colon |
+ |
Plus sign |
|
; |
Semi-colon |
; |
Back slash |
|
# |
Pound sign |
/ |
Forward slash |
|
< |
Left care |
, |
Comma |
|
> |
Right care |
- |
Dash |
|
& |
Ampersand |
^ |
Circumflex (caret) |
|
$ |
Dollar sign |
‘ |
Accent grave |
|
= |
Equal sign |
{ |
Right bracket |
|
% |
Percentage sign |
} |
Left bracket |
|
? |
Question mark |
| |
Pipeline sign |
|
@ |
At sign |
. |
Period |
|
’ |
Apostrophe |
_ |
Underscore |
|
( |
Open parenthesis |
> |
Double quote |
|
) |
Close parenthesis |
* |
Asterisk |
|
[ |
Left bracket |
- |
Hyphen |
|
Format |
One punctuation character chosen from the list above. The default is a dash (-). |
|
Example |
N/A |
Cost center
If you use two segments in your cost center, the default names are Division and Department respectively. These are abbreviated Div and Dept. If you use only one segment, its default name is Department.
Wherever the first segment of the cost center is referenced in screen prompts, captions, and error messages, as well as in report headings and legends, the name you assign here will be used.
Enter a name for this segment, or press <F1> for the default name: Division if you use two segments, or Department if you use one.
|
Format |
Up to 15 characters |
|
Example |
N/A |
The name which you assign here will appear as an abbreviation of the full name entered above whenever required by space limitations.
Enter an abbreviation of this segment’s name, or press <F1> for the default abbreviation: Div if you use two segments, or Dept if you use one
|
Format |
Up to 10 characters |
|
Example |
N/A |
Enter the size of this segment. The minimum is 1. The maximum can never exceed 8. After determining the sizes already used for main account and sub-account, the system calculates the maximum available to you and displays the size you may choose.
|
Format |
9 |
|
Example |
N/A |
This field has the same meaning as for the main account number Alphanumeric field described above.
|
Format |
Drop down list with the choices Allow letters and numbers or Allow numbers only. |
|
Example |
N/A |
This field has the same meaning as for the main account number Fill requirement field described above.
|
Format |
Drop down list choices of Fill zeros on left or Fill with spaces on right. |
|
Example |
N/A. |
This field has the same meaning as for the main account number Suppress spaces field described above.
|
Format |
Check box, where checked is yes and unchecked is no. |
Example
In this example the field is (Not available) because you have entered Allow number only for Alphanumeric.
Wherever the second segment of the cost center is referenced in screen prompts, captions, and error messages, as well as in report headings and legends, the name you assign here will be used.
Enter a name for this segment, or press <F1> for Department.
|
Format |
15 characters |
|
Example |
In this example this line of the screen cannot be entered because you have chosen a single-segment cost center. |
The name which you assign here will appear as an abbreviation of the full name entered above whenever required by space limitations.
Enter an abbreviation of this segment’s name, or press <F1> for Dept.
|
Format |
10 characters |
|
Example |
N/A |
Enter the size of this segment. The minimum is 1. The maximum cannot exceed 8. After determining the sizes already used for main account, sub-account and cost center 1, the system calculates the maximum available to you and displays the size you may choose.
|
Format |
9 |
|
Example |
N/A |
This field has the same meaning as for the main account number Alphanumeric field described above.
|
Format |
Drop down list with the choices Allow letters and numbers or Allow numbers only. |
|
Example |
N/A |
Example
In this example this line of the screen does not appear because you have chosen a single-segment cost center.
This field has the same meaning as for the main account number Fill requirement field described above.
|
Format |
Drop down list choices of Fill zeros on left or Fill with spaces on right. |
|
Example |
N/A |
This field has the same meaning as for the main account number Suppress spaces field described above.
|
Format |
Check box, where checked is visible and unchecked is no. |
|
Example |
N/A |
Make any needed changes, or press <Enter> to proceed to the Printers tab.
This tab is used to define Company information printers used in the PBS system for printing reports, posting registers and special forms.
The basics of the PBS printing functions, options and use are covered in chapter 2 Starting PBS, Menus and Printing of the PBS System documentation. You may want to read this first before and after you enter the printers.
Shared Network Printers
The shared printers must be set up on the server and the workstation before you can set up a printer here. When you add a printer on the workstation, set it up against the share on the network and make sure the naming convention is consistent. This will allow you to set up one printer in Company information and call to it from multiple workstations. Thus you set up a printer once and it functions on each workstation.
You should test the printer on every workstation after you complete the setup of a Company information printer. If it does not work, you may adjust the share name or set up a different printer for that workstation.
Windows Printer Option
All reports, posting registers and many forms can be printed using Windows printer. You can set the "central printer" as the default Windows printer and use Windows printing in which case no Company information printer would be needed and the default printer will appear automatically when you select the Windows printer option. The Windows printer selection does not require any setup in Company information. However, with some form types Windows printer is not appropriate, such as Accounts Payable checks and certain Payroll check types, so you must use a Company information laser printer in this case.
Windows printer is not available in the telnet version of PBS on a Linux system, unless you have Thin client. Thin client is highly recommended when running PBS on a Linux server. Ask your PBS provider about Thin client.
|
Note |
Most of the fields on this tab are stored in Company information (COMPFIxx.DAT), or in the case of SQL the COMPFIxx table where xx represents the Company ID. However, the Device-name field is stored in the Printer Configuration file (PRTCFGxx.DAT). COMPFIxx.DAT is located in the RWxx folder. The PRTCFGxx.DAT is located in the top-level PBS folder. |
On an operating system a print job can be anything you are printing including a report, spreadsheet, word document and so on. The Windows operating system standard is to control the print job with the printer driver. The driver stores the file in a print queue and sends it to the printer as soon as it can. PBS Windows printer moves the print job through the printer driver. However, with a PBS Company information printer, operating system printer drivers are partially bypassed and much of the print job data is sent either directly to the printer or to the printer Spooler. Formating is done by PCL codes and not the application pldriver.
Laser Printers
A PCL5 compatible laser printer is recommended for most forms printing. In some cases, like A/P checks and Payroll checks, a PCL5 compatible printer is required.
The Company information method of printer job routing works well, but has a drawback when printing forms with non-compatible PCL5 printers such as a few models of laser printers, most Ink jet printers and most mufti-purpose printers. For example a mufti-purpose printer may also allow scanning and faxing. These are called Windows-only printers.
Forms Alilgnment
Most PBS form types require PCL (printer control language) codes to properly align the form with the data. A Windows-only printer does not accept PCL control codes or any type of alignment capability. Therefore a Windows-only printer is not recommended for printing special forms. For technical information on PCL, read the PCL Commands section in the More on PBS Printing chapter.
|
Note |
The type of printer that will work for any printing situation in PBS is a Laser printer that is PCL5 compatible. There may be more than one driver available for your printer. One of the drivers may be PCL5 compatible and the other may not be. Be sure to use the correct driver. |
|
Note |
When printing a report or form, every user in the PBS system will see a list of the printers set up in Company information and they will be able to select one the printers for the print job. However, if the selected printer is not accessible from the user's workstation the report or form will not go to this printer. This can happen with a local printer set up on some other workstation and for a shared network printer where the driver is not installed on the workstation. |
You must define at least one printer in Company information, and may define as many as twelve in Passport Business Solutions in Windowless client and fourteen in Linux versions of Passport Business Solutions.
Linux Thin Client Graphical Mode
There is a known issue when on Linux using Thin client. When assigning a printer using graphical mode the screen locks. You MUST use character mode to assign a printer. This is thought to be a runtime issue and will be fixed in a future release of PBS.
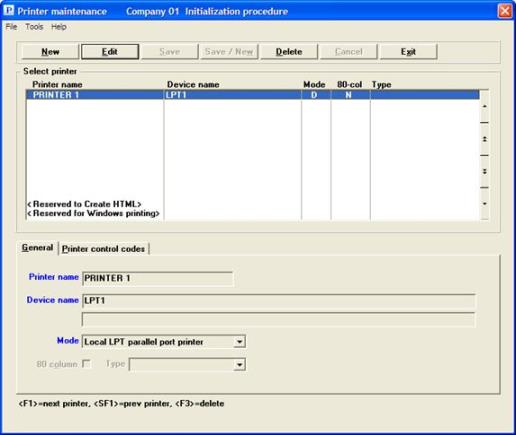
Windows Graphical Mode
The fourth tab displays the printer setup. In order to edit the printers, you must select the Edit printers button. Then you will see a screen like the following:
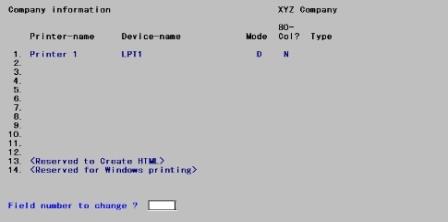
Character Mode
A screen similar to the following screen is displayed:
|
Note |
If there are no printers set up in the company, use character mode to set up the first printer. Each additional printer can be set up using graphical or character mode. |
The names you assign here will appear on a printer selection menu whenever a PBS user prints a report or a special form using Passport Business Solutions software, so use names meaningful for selection. For example, you could assign Network, Local, Second floor, etc.
The only restrictions on printer names are that no two printers may have the same name, and the first character of the name must be either an upper-case letter or a numeric digit.
You must also use this field to trigger the generation of PDF files. If you want to generate PDF files for forms, see PDF Printing below.
Enter a name for this printer, or use the option:
|
Blank |
To delete this printer (fields may be blanked out by pressing <Ctrl>+X). In Windows you can also highlight the field and select the delete key. |
|
Format |
15 characters |
|
Example |
Type: Laser Printer |
In Windows the virtual printers 13 and 14 are implicitly defined as Create HTML and Windows Printer and you can not change them. Windows Printer is available on almost all printer selection menus. The Create HTML selection is provided on report printer selection menus but not for special forms (invoices, checks, etc.) and audit-trail reports. The use of these functions are explained more fully in chapter 2 Starting PBS, Menus and Printing of the PBS System documentation.
|
Note |
When one user is using a printer similar to another user the users can share the same Company information printer setup. For example, if user A has an HP 4600 Laser printer on his workstation and user B is using the same type of HP 4600 laser printer on her workstation you can use the same Company information printer setup for both users. However if the drivers are different this may cause an issue. Take a look at the driver versions if this does not work. |
All reports, certain forms and files printed to disk can be created as a PDF file. In many cases the PDF file will display on screen.
|
Note |
When printing a report to screen there is an option to select View as PDF running graphical mode or Display to screen option <P> running in character mode. If you are going to use these options exclusively you do not have to set up a Company information PDF printer. A Company information PDF setup is required and only needed for generating PDF forms that can be emailed. |
To create PDF files you must make or alter a specific entry in the Printer-name field. The printer-name must have -PDF- or -PDFP- as part of the name. It can be anywhere on the field as part of the name. Here are four PDF printer name examples:
Laser X & -PDF-
-PDF- Generator
-PDF-
-PDFP-
-PDF- HP Laser
When you select -PDF- the program will create a PDF file only. When you enter -PDFP- what happens depends on what you are printing:
| • | For forms it will then create both a PDF file and send the job to a printer, except if it is an immediate invoice. In this case it will display the invoice and print it |
| • | For reports the program will be send the job to the printer assigned on the Device name field |
-PDFP- only works on Windows operating systems where -PDF- works on both Windows and Linux. As Thin client is run on a Windows operating system, this will also work.
-PDFP- and -PDF- MUST BE ENTERED IN UPPERCASE (capital letters).
You must fill in the remaining printer fields with some data. You may use the remaining fields to print any other special forms that cannot be created as a PDF file or for -PDFP- printing. For example, A/P checks cannot be printed to PDF files, therefore to also use the same printer selection to print checks, enter a printer meaningful to your system. The same applies to reports.
When printing a report to a -PDF- printer the report displays on screen in either Adobe™ Acrobat Pro or Adobe Reader™, which ever is installed. If you setup a PDF printer, you should verify that every workstation has either application installed. If not installed, the PDF file gets created, but it cannot be displayed.
|
Note |
There is an issue when using -PDFP- and Acrobat Reader 11 and Adobe Acrobat 11 (full version). Back up the current registry settings before changing them. When Acrobat 11 is installed on a workstation it creates the wrong registry key. This causes -PDFP- to not work when printing forms. You may fix this by updating this registry key: HKEY_LOCAL_MACHINE\SOFTWARE\Classes\acrobat\shell\open\ddeexec\application For Acrobat Reader open the registry and change acroviewR10 to acroviewR11. For Adobe Acrobat open the registry and change acroviewA10 to acroviewA11. This would have to be done on every workstation that uses -PDFP- where forms are printed. Changing the registry incorrectly can cause severe computer problems. You should back up the registry before you make the change and create a restore point. If you are uncomfortable with this procedure contact a systems administrator to help you. |
For more information and additional setups see the Windows Printer and PDF Forms Table and More On PBS Printing sections in the More on PBS Printing chapter.
If you are printing the special forms A/R invoices, statements, O/E forms or Purchase orders to the PDF generator then individual PDF files will be created on the system for each transaction. These files are created in the PDFFIL directory on the PBS system. Each form type has a sub-directory under that for storing the files. Here is a list of the directories.
PDFFIL\ARINVOICES
PDFFIL\MANUFACTURING
PDFFIL\OEINVOICES
PDFFIL\PSIPOS
PDFFIL\PURCHASEORDERS
PDFFIL\STATEMENTS
The alignments associated with each form are stored in the PDFFIL\ALIGNMENT directory.
The GENERAL and APREMIT directories are not currently active.
Files that have been written to these directories can be viewed and emailed from the CTL menu selection PDF form file processing. See the PBS System documentation for instructions. To set up emailing PDF documents, see the Email Configuration appendix.
|
Note |
When using -PDFP- to print forms the Adobe Reader may erroneously open on the Windows workstation task bar. If this happens, it will have to be closed following the print job. |
Do not use -PDF- and -PDFP- on the same Printer name field.
A device name is a logical association to a piece of computer hardware.
When you first installed the PBS software, the installation procedure supplied a device name for the first printer field.
The setups for Linux printing vs. the Windows printing is different.
For Linux systems the default Device- name is installed as /dev/lp0. In some cases an asterisk will display next to the Device-name field. This is needed for Thin client installations to identify the server printers vs. the local printer.
For more information see the Linux Spooling section in this chapter and the section Printing in a Linux Environment in the More on PBS Printing chapter.
Printing Setup in Windows
Enter the name of a device or of a spool file, or use one of the options:
|
<F1> |
Press <F1> to use -D LPT1 for a locally attached printer. |
|
<F7> |
Press <F7> to display the PSI Printer locator. A -Q data string is needed for printing to a network printer or a USB printer. The PSI printer locator will auto-input this string. The details on using this are in the paragraphs below. |
|
-P Windows Only Device |
Type -P SPOOLER-DIRECT to call the Windows Print Manager when you select this printer from the printer selection screen. This option outputs directly to the selected printer. See the note below on the issues with this printer type.
This printer type has potential issues. See the section a few pages later on -P SPOOLER-DIRECT. |
|
Format |
Two lines of 64 characters each |
|
Example |
Press <F1> |
When you first set up a printer the default device name for the first printer is -D LPT1.
You can enter the -Q string values manually if you know what they are, but using the Printer locator is usually easier and often more precise.
|
Note |
If you replace or alter a printer on the workstation, you must edit the printer <F7> setting in PBS. |
Here are some details on each of the options:
-D LPT1
You can only use -D LPT1 for a local workstation printer.
Also, you can have several users, each with a local workstation printer, that can share the same Company information printer setup if each printer uses the same printer type. If you select -D LPT1, then your in the Mode field you should enter D for Local LPT1 parallel port printer. For more information see the Direct (D) Printers section later in this chapter.
The Windows PSI printer locator will help you identify and auto-input the -Q (windows queue) data string.
To access the printer locator type the <F7> key. A screen similar to the following will display.
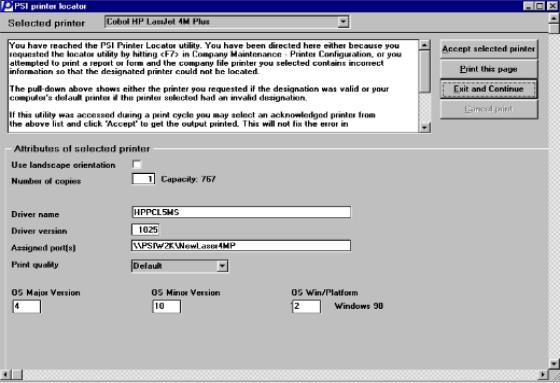
You have the following options in the locator window.
|
Selected printer |
Select the printer you want to accept for auto-input into the device name field. When you first bring up the PSI printer locator window The workstation default printer will display here. |
|
Accept selected printer |
Click on the this button to return the -Q string to the device name field. |
|
Print this page |
Click on this button to test print the information about the selected printer to that printer. You can change the number of copies and check the box “Use landscape orientation” if you want to print the test page that way. The landscape and number of copies selections only work with the locator. They will have no effect when printing anywhere else in PBS. |
|
Exit and Continue |
If you do not want to accept the printer settings, you can exit from the locator with this button. |
When you click on Accept selected printer, you will see the Device-name field auto-filled in by the PSI printer locator. It will look something like the following screen.
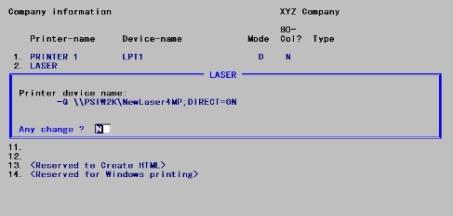
If the Device-name you enter is not recognized by the system as a valid device, the selected report or form will be written to a file with the name of the file matching the Printer name. This protects you from losing a report when you accidentally define a non-existent printer or if a printer is removed from the system. If a report or form seems to go nowhere, (nothing happens) check the top-level PBS directory for a file with a name that matches the Printer-name. This will not occur with a “-Q” printer, as PBS will display the Printer locator so you can select a different printer.
|
Note |
Although for local parallel printers it is perfectly acceptable to use the “-Q” option, even in single user installations, with PBS multi-user installations a local parallel port printer can be used for forms and can be defined with the “-D” option. For a local USB printers the “-Q” option is recommended. |
There are different Local and Remote printer topologies as it relates to the Device-name field. These are represented in the following table.
|
|
Printer topology |
Type of string to enter in the Device name field |
|
LOCAL |
Std port (LPTx:. COMx:) |
LPN (See note above.) |
|
LOCAL |
USB port |
LPN (See note above.) |
|
REMOTE |
To a Microsoft server |
UNC** |
|
REMOTE |
To a peer PC |
UNC** |
|
REMOTE |
To Peer Printer |
LPN (See note above.) |
** Depending on host O/S version and client O/S version, the UNC (Universal Naming Convention) can be reported at the client as one of two values:
\\host_name\host_share_name
or
\\host_name\host_LPN
|
Note |
LPN note. It is better for compatibility across different versions of the Windows operating systems, that the Workstation Local Printer Name (LPN) and the Server Share Name be made the same. |
Windows Print Controls
You may enter specific print controls for your printer, such as number of copies, collate, landscape orientation, font pitch, font size and more. See the Device name Field Windows Printing Controls section in the More on PBS Printing chapter.
-P SPOOLER-DIRECT
This option, a holdover feature from an earlier version (RW32), is no longer recommended for use. However, we know that some systems are set up to use this printer type. If you feel it is absolutely necessary and it is working properly, you may continue to use it for single user workstations and where all the selectable workstation and network printers share the same type. However, at your earliest convenience we recommend that you set up the printer with the -Q option.
|
Note |
Use -P SPOOLER-DIRECT with caution. Use of this Windows Special Device does not override other printer settings for the printer. Compression, reset, and laser control codes will still be sent to the printer when this printer is selected. This is fine if all of your printers share the same type. Undesirable output will result when the printer type defined in Company information and the printer selected from the Windows dialog are not compatible. |
After entering the device name or using the PSI printer locator to create the -Q string you will be at this prompt.
|
<N> |
This is the default and accepts the entry of the device name. |
|
<Y> |
Enter Y and then the Enter key if you want to make a change to the device-name field. |
In this field you define the print job delivery mode. You have these options:
|
All other printers (S in character mode) |
Select All other printers in Windows for printers other than a local parallel port printer. If printing to a spooled printer, a print queue or if the Windows printer property Spool Settings are set to spool print jobs. Spooling also applies in Linux, however, you will not be able to change this setting. The printer must be defined in the Linux cblconfig file. When you enter the printer name the program will auto-enter S for the mode field. If you are using Thin client on Linux, then you must also set up the printers in the cblconfi file (notice the g is missing in the file name). |
|
Local LPT parallel port printer (D in character mode) |
Select Local LPT parallel port printer in this field if the printer is attached directly to your workstation computer parallel port. You must use this in conjunction with -D LPT1 as entered in the Device name field. For more information see the Direct (D) Printers section later in this chapter. |
|
L |
Linux Only Option: Type L for local printing if your printer is attached to terminal port. Important Note: This is no longer supported. |
Depending on what you have entered for a device name not all of these choices may be available for Linux.
There are differences with spooled printing for Windows and Linux.
In Windows, enter All other printers in the Mode field under the following conditions:
| • | The printer is connected to your machine and the Windows printer properties specify that output to this printer is spooled. |
| • | The printer is a Windows network printer and is connected to another machine on the network. |
| • | The printer is a Net ware print queue. |
| • | Any situation where a software program will take control of the print job before it is printed on the printer. |
When you are using spooling and print a special form, the printer is released from the control of PBS. Therefore the potential exists for another user to take control of a shared printer during these print functions.
Momentary loss of printer control is introduced after printing a forms alignment and just after printing some special forms where you are asked if the printed forms have been printed properly. Therefore another user could send a print job between the time you print an alignment and print the data.
For Linux users enter “S” in this field for printers that are defined as Linux spooled printers.
A spooled device must be defined in the cblconfig file in the top-level Passport Business Solutions directory. The Device-name must be identical to the DEVICE-NAME entered in the AcuCOBOL cblconfig file.
If you are using Thin client on Linux, the same printers must be setup in the cblconfi file.
The entries, made in cblconfig entrain cblconfi, for Linux and UNIX are similar in concept but differ in syntax. Entries have the following format:
LINUX
DEVICE_NAME -P lpr -Pprinter_name
UNIX
DEVICE_NAME -P lpr -s -dprinter_name
Device_name
Enter the name of this device exactly as you have entered it in the Device-name field in PBS Company information.
Printer_name
This is the name of the spool printer that you set up in your LINUX system.
If there is no entry in cblconfig or cblconfi for the printer device name you are using in the company file, the report or form will be printed to a file of the printer name in the top-level directory.
|
Note |
When using Thin client in a Linux environment, the printers must be set up in two files, cblconfi and cblconfig. The first is for printing from the character screens and the second when accessing via Thin client. |
The syntax for device definition is entered in the cblconfig file and documented in the Printing in a Linux Environment section of the chapter called More On PBS Printing.
If the printer you are defining is connected directly to your computer parallel port, then you may use an entry such as -D LPT1:, -D LPT2:, or for a Linux server /dev/lp0 and enter “D” in the Mode field.
Selecting D will indicate that this printer is attached directly to your computer and that output is sent directly to the printer. This is the recommended mode for tight control when printing special forms such as checks, invoices, and picking tickets.
Local mode is available only in Passport Business Solutions for Linux. This mode indicates that you wish to send printed output to a local printer that is attached to a terminal. Note: Terminals and terminal printing is no longer supported.
If you select L, you must supply additional control codes for auxiliary ports. A screen will display to allow entry of these codes:
Aux on and Aux off job
Local printing under Linux requires that you enter codes for Auxiliary Port On and Auxiliary Port Off. Consult the hardware manual of your terminal.
If this printer can print only on paper that is less than 14-1/2 inches wide (an 80-column printer), or if you intend to use the narrower paper, check this box. If you have a Laser printer or Desk jet printer you will want to check this box.
If this printer is capable of printing on paper at least 14-1/2 inches wide (a 132-column wide-carriage dot-matrix or pin-feed printer), leave it unchecked.
When you identify a printer as being 80-column, this informs Passport Business Solutions to use smaller print characters. Checking this box will then require you to enter the field for printer type.
|
Format |
Check box where checked is yes and unchecked is no. |
|
Example |
Check this box and then press <Enter>. |
If you use an 80-column printer, you must also specify the type of printer (because different hardware devices use different techniques for compressing a full line of text into an 80-column width.)
Knowing the type, Passport Business Solutions software automatically provides the special control codes required to make the smaller print characters.
A list of available types containing some of the most frequently used printers displays:
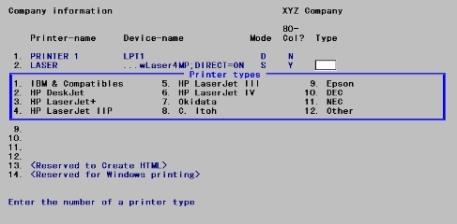
You may not see the printer type name that matches what you have, but many printers share certain standards. For example, the HP Laser Jet IV will work for most of the newer HP modules and often works for modules manufactured by other companies.
Another example, an Epson™ printer uses the same control codes as an IBM. You could actually identify your Epson printer as an IBM and the compressed print characters would be correctly formed.
If you cannot find your printer type on the list, try experimenting with the printer types to determine if you can print with a smaller print. Try selecting a printer type and print a report such as the Valid G/L Accounts List.
If you do not find a matching printer type or choose not to experiment in this way, select Other. The next section, Other Printer Types, will provide you with a description of the Other fields.
To determine compatibility, refer to your printer manual.
Enter the type which corresponds to your printer, or select Other.
|
Format |
99 |
|
Example |
In this example the cursor does not move to the Type column because you are not using an 80-column printer. |
The following sections apply only if you selected Other for printer type, if not, you may skip to Special Printing Features and Control Codes.
A screen appears for entry of the Compress and Normal codes. These are non-printing codes which the software will send to the printer to switch it to compressed print mode and to normal mode respectively.
The screen appears as follows:
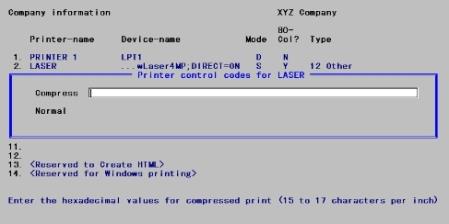
Printer codes are in hexadecimal format: each code consists of a pair of digits, where a digit is 0 through 9 and A through F.
| • | Some printer manuals show only escape codes (or control codes, etc.), and not the equivalent hexadecimal codes. In these cases, convert the codes to their equivalent hexadecimal codes. |
| • | Although there is room for 60 characters, most printers use much shorter codes. |
Enter the following printer codes:
Compression mode should be about 15 to 17 characters per inch; if your printer has several compression modes, use the one that comes closest to this.
|
Format |
60 hexadecimal characters in pairs. |
|
Example |
In this example the screen does not appear because you are using a printer recognized by the system. |
Normal printing is considered to be 10 to 12 characters per inch.
Normal codes are sent to the printer to return it to normal-sized font. This is needed so that special forms (such as checks) can be printed at full width.
|
Format |
60 hexadecimal characters in pairs, with no spaces between them. |
|
Example |
N/A |
If this is a laser printer, then go to the Laser control codes section.
Character Mode
After completing the screen (had you selected other for the printer type), you are asked Any change?. Make any needed changes.
After you answer N to Any change?, you are asked Is this a laser printer? This is because laser printers require additional control codes. If you answer Y, a window displays for entering laser control codes.
The screen displays as follows:
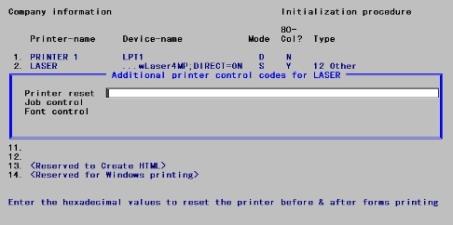
Enter the following information. Refer to your printer manual for appropriate codes or contact your supplier. You may also see the Special Forms and Laser Printers section in the More on PBS Printing chapter.
Printer reset codes reset the printer’s feature settings (top margin, left margin, page size, etc.) to their default values. These codes are sent at the start of a new print job. This ensures that the settings of the previous print job do not interfere with the new print job. They are also sent at the end of a print job so that the settings of that job do not remain in effect for following print jobs.
Enter printer reset codes.
|
Format |
60 hexadecimal characters in pairs, with no spaces between them |
Job control
Job control codes establish page size, page length, top margin and other settings. These codes properly configure the printer for the print job and are sent to the printer at the start of a print job.
|
Format |
60 hexadecimal characters in pairs, with no spaces between them. |
Font control
Font control codes set the type style, size, height and other settings. They are sent to the printer after the job control codes.
|
Format |
60 hexadecimal characters in pairs, with no spaces between them. |
Also refer to the PCL Commands section in the More on PBS Printing chapter.
If your printer supports different print styles (e.g., italics, pica, elite) you may wish to use them for special purposes. For instance, you may want fast but low-quality printing for seldom-consulted archival reports, and at other times you may want double-strike letter-quality styles for financial statements.
You can do this by entering the appropriate codes for your printer in the Compress and Normal fields. Think of these as start codes and end codes respectively—they are the codes that are sent to the printer at the start and end of each job. The names Compress and Normal reflect their primary use, but this is far from their only use: you may enter any codes supported by your printer. It is for this reason that the field size allows entry of as many as sixty hexadecimal digits.
To use this feature, check the box to 80-col and select Other printer type, even if your printer does in fact appear on the list of recognized printers.
You do not have to change the control codes every time you want to change fonts on your printer. You can redefine the same physical device as many times as are needed for all the print styles you wish to use. Each redefinition must have the same device-name, but a different printer-name. The various printer names will all appear on the printer selection menu and will all refer to the same physical device. Be aware that although you can print different reports in different print styles, you cannot change print styles in the middle of a report.
In general, you should ensure that your end code turns off whatever you turned on by your start code. If not, the printer will continue to use that start code for the next report (and even after you have exited Passport Business Solutions). This may cause unpredictable results. You should decide for each physical device what its default print style should be, and see that the end codes restore that style.
To use a special feature (such as a different font) of a Hewlett-Packard (or compatible) laser printer when printing special forms, check the box to 80-col, select Other as the printer type, and check the Laser box (in character answer Y to Is this a laser printer ?), after entering the Compress and Normal codes.
For the Printer reset codes and Job control codes, enter the standard Passport Business Solutions codes.
The standard Passport Business Solutions codes will properly position the printed information on a letter-size special form.
The standard Passport Business Solutions font control codes enable your special forms using the courier font that is included with all Hewlett-Packard (or compatible) laser printers.
However, you can use the font control codes to use an entirely different font, or to change the style of the font to bold, italics, etc.
To properly print on a standard preprinted form, use a fixed-pitch font that prints at 10 characters per inch and 6 lines per inch. Otherwise, the printed characters will not print in the desired location on the form.
Also refer to the PCL Commands section in the More on PBS Printing chapter.
Make any needed changes, or press <Enter> to go to the next tab.
The PSI Printer Locator Debug mode provides a means of identifying and handling printer issues. Through a configuration file setup the PSI Printer locator window displays after selecting a Company information printer.
If you are encountering printing issues in PBS or if you have a printer that is working inconsistently this debug mode may help you solve the problem or at least provide an opportunity to select another printer if the initial printer call fails.
There is an on/off switch in the cblconfi file. The line for this switch is
DISPLAY-LOCAL-PRINTERS-POPUP-SCREEN
This switch accepts either a Y or N value.
Do not remove or change the other settings in the cblconfi file. See the COBOL Configuration File appendix for information on other settings.
The value N is the default and means that the PSI Printer Locator will operate ‘silently’ for any printing and will only display if the printer selected cannot be located or validated.
Enter Y to display the Printer Locator window every time a print output is requested. This may be useful when you are first setting up a system and you want to guarantee a connection to some printer.
The Printer Debug is global for every user and for every company that uses the cblconfi file. It is possible to make copies of this configuration file for each user and/or each company. If this has been done, you will have to modify each cblconfi.xxx file for each company or user where this flag needs changing.
If you have the flag set to Y, then the PSI Printer Locator will display even when non “-Q” printing is requested such as with a “-D” and in all these non “-Q” cases. It will report the selected printer as an error since the program will not be able to locate a queue. This is expected due to the program design which was intended to work only with “-Q” based printing.
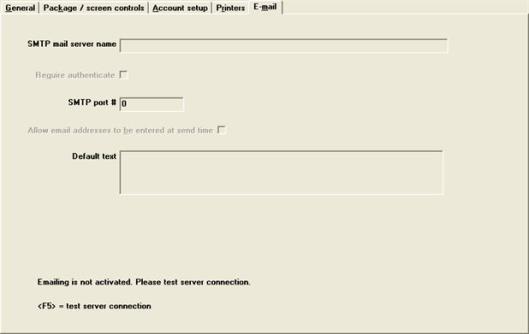
If you are emailing PDF forms from PBS, you must enter data on this screen. Otherwise you may leave the fields blank.
See the Email Configuration appendix for all the steps needed to fully implement document emailing within PBS.
Graphical Mode
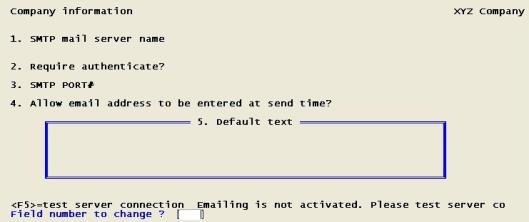
Character Mode
For this screen, enter the following information:
PBS can be configured for the SSL webmail provider gmail.
Gmail Activation
For gmail use smtp.gmail.com as the SMTP server name and use a port of 465.Check the Use SSL connection field and check the Require authenticate field. Turn ON the setting of Less secure apps. Here are the steps for using Gmail with less secure apps.
| • | First, sign into Gmail on your computer. |
| • | Next, go to this link for accessing a another link to the Less secure apps setting: |
https://support.google.com/accounts/answer/6010255?hl=en
| • | Scroll down that page. Under Option 2 you will see step 1. Go to the "less secure section" in my account. |
| • | Click on that. Change the setting to allow less secure apps. |
| • | Save your settings and activate emailing in PBS using your Gmail email address and password. |
Enter the name of a server which can process outgoing mail on your behalf. The PBS program asks the server to send outgoing mail on your behalf, so the computer you name must be running an SMTP server. Your system administrator or service provider will be able to tell you which server or address to use for this field.
This could be either the Retrieving POP3 Server Host Name or the Sending (SMPT) Server Host Name.
If you are not using email, select the <Enter> key to bypass this and the remaining fields on this screen.
|
Format |
60 characters |
|
Example |
Press <Enter> |
This field is optional. If you want more information read the appendix Email Configuration.
Check this box to require an email authentication or leave it unchecked to not require it.
Some email services require that a user name and password be entered to send emails. If this is the case check this box. If your email service does not require a user name and password to send emails, then do not check this box.
When activating emailing, the Email login name and Email login password fields will only display if this box is checked. Otherwise they will not be available.
A PBS user's email password is not saved in PBS. If this field is checked, you will be required to enter an email password when:
| • | Activating emailing in Company information. |
| • | Emailing PDF files using Email/view printed PDFs. |
| • | Selecting automatic emailing of Pay advices when doing a check and direct deposit pay run in Payroll. |
|
Format |
Check box where checked is yes and unchecked is no. |
|
Example |
Not entered in this case. |
This specifies the TCP/IP port number that PBS should connect to when sending email.
Enter the port number for the SMTP mail server.
|
Format |
4 digits |
|
Example |
Not entered in this case. |
The standard values for this field are 25 and 587. If you enter some other number, then you will be asked:
Non-standard port#. Are you sure ?
Select Yes if you want to retain your entry or No of you want to change it.
Check this box to if you are going to use an SSL connection.
Some (but not all) email servers that accept SSL connections can also handle non-SSL connections. If your connection accepts both, then contact your email provider and ask which to use.
|
Format |
Check box where checked is yes and unchecked is no. |
|
Example |
Not entered in this case. |
Allow email address to be entered at send time
This setting only effects certain email address entry and selection options. When checking this box all the options are available. When leaving the box unchecked some of the options are not available. This table illustrates which option is effected by this setting:
|
Email Option |
Setting is Yes |
Setting is No |
|---|---|---|
|
Change contact email address |
Available |
Not available |
|
Select a different contact. (If other contacts have email addresses and the Email documents field is checked.) |
Available |
Available |
|
CC (copy) yourself |
Available |
Available |
|
Enter additional CCs |
Available |
Not available |
|
Select CC from contact file |
Available |
Available |
|
Format |
Check box where checked is yes and unchecked is no. |
|
Example |
Not entered in this case. |
Enter the default text for the body of the email. You may enter up to 4 lines of text.
|
Format |
4 lines of 60 characters each |
|
Example |
Not entered in this case. |
Make any changes or select the enter key to accept the changes. To not save the changes select the <Esc> key.
If email is active, then the following message will display:
* * * Emailing is activated * * *
If email is not active, then the following message displays:
Emailing is not activated. Please test the server connection.
You must save your settings before you activate email.
After you have entered email server data and saved your settings you may use these options:
| Edit | Select the Edit button |
|
<F5> |
To test the server connection. |
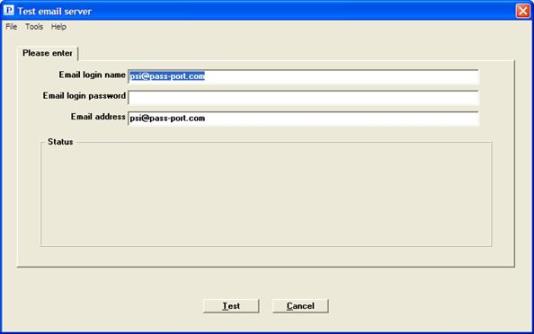
Graphical Mode
After selecting <F5> the following screen appears:
Character Mode
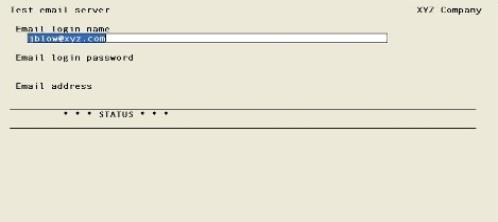
You may enter the following:
Enter the sending email address.
The email address from the user you are logged in as will display, if one has been entered. This field cannot be entered if you unchecked the Require authenticate field.
|
Format |
60 characters |
|
Example |
Not entered in this case. |
Enter the email password that corresponds to the entry in the Email login name field. This field cannot be entered if you unchecked the Require authenticate field. Your password must not have a space in it.
|
Format |
30 characters |
|
Example |
Not entered in this case. |
The address you enter here will be the From and To addresses for the test email. It may be your own email address or any address you want to use for this test.
|
Format |
60 characters, the default is the email address of the user logged into PBS. |
|
Example |
Not entered in this case. |
When you select the enter key, then the program will attempt to connect to the SMTP mail server by sending an email.
If sending the email is successful, then the following message will appear:
Successful transmission. Closing connection.
* * * Emailing is activated * * *
Select the <Enter> key to exit the screen.
If sending the email is unsuccessful, then the following message will appear:
Failed to connect to SMTP server
Error: SMTP SSL Connect ! -52
You have the following options:
|
<F5> |
To change the server name or port number and try the connection again |
|
Enter |
Select to print the error report |
Make changes as needed and test the connection again.
Some of the possible reasons why a connection failed are:
| • | The connection to the Internet is not available. |
| • | The required port number is different than what you entered. |
| • | Email is not setup or active on your workstation. |
| • | For the user you are logged in as, the email address is not valid on the workstation. |
| • | You are attempting to connect via SMTP but you are using an SSL connection. Or vice versa. |
If you do not check Use SSL connection, but enter a SSL email client, and select <F5> to test server connection, the following error displays.

Then you must click on OK before going back to the setup screen.
When you misspell the Email log in password on the TEST EMAIL SERVER screen, the following error is displays:

Click OK and this screen displays:
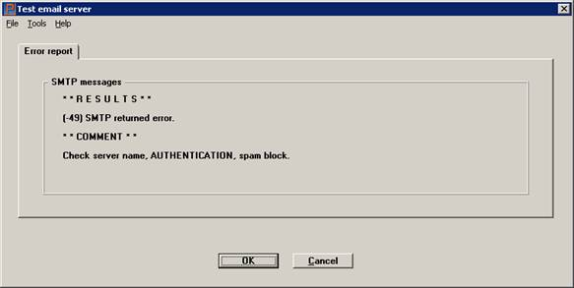
When wrong SMTP port # is entered the following error is displayed:
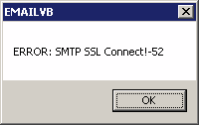
On the next screen you have to click OK before being able to click the cancel button.
TLS vs. SSL and Office 365
Office 365 can be configured for both. You must use SSL and not TLS.
-49 and Time out due to Exceeded Email Quota
If your email provider limits the number or emails that can be sent over a period of time, a timeout could occur when emailing stacked PDF files in PBS. You will see an error message similar to this:
![]()
After that you may also see a message indicating the SMPT returned error.554.5.7.1 and then a message saying: Email log file not found. Please exit to the main menu & retry. The computer on which PBS is installed may need to re-started as certain programs can be locked making them unusable.
If the log file is generated in the RWWRK folder, near the end of the file it may contain information similar to this:
SUGGESTED FIX = Check server name, AUTHENTICATION, spam block.
R: 554 5.7.1 [xxxxxxxx@XXX.com]: Recipient address rejected: Message quota exceeded
Solution: Contact your email provider to allow more emails per day or limit the number of emails you send over the time period.
More Errors
See the Emailing Errors section of the Email Configuration appendix for a list of possible WinSOCK and Marshall Software error codes. Marshall Software is a third party product that PBS uses to send emails.